Recording Modes
The recording mode defines what happens when you press the recording button or hotkey. In all modes, the app sends only fragments where speech is detected for transcription.
Automatic (VAD)
VAD is best for regular conversations, interviews, and calls where speech can start and stop without you managing every fragment.
Important: you still need to turn VAD on with the recording button or hotkey. After it is on, the app listens to the selected audio sources and detects speech automatically. When someone speaks, the fragment is recorded. After a pause, the fragment is closed and sent for transcription. When you turn VAD off, the app stops analyzing audio.
How it works:
- You turn VAD on
- The app listens to the selected audio sources and looks for speech
- When speech is detected, a recording fragment starts
- After a pause, the fragment is sent for transcription
- If speech continues for a long time, recording can be split into chunks

Manual (Toggle)
Toggle is for cases where you want to choose the start and end of a fragment yourself. The first press of the recording button or Ctrl+R starts recording, and the second press stops it and sends the audio for transcription.
Before recording starts, the app keeps a short background buffer. If you press the hotkey slightly after a phrase begins, the first seconds can still be included. If the final fragment does not contain speech, it is discarded automatically.

One-shot (Oneshot)
One-shot is for questions you want to hear in full before asking for an answer. Do not start recording ahead of time: wait until the other person finishes, then press the recording button or Ctrl+R. The app takes the latest audio from the buffer, transcribes it, and uses it for the answer.
This mode is useful when you do not know in advance which moment will matter. It does not record a long start-to-stop segment; it takes one short snapshot of recent audio.

Selecting Recording Mode
Open settings (gear icon in the side menu), section "Audio Recording". Here you can select the recording mode and configure other parameters.
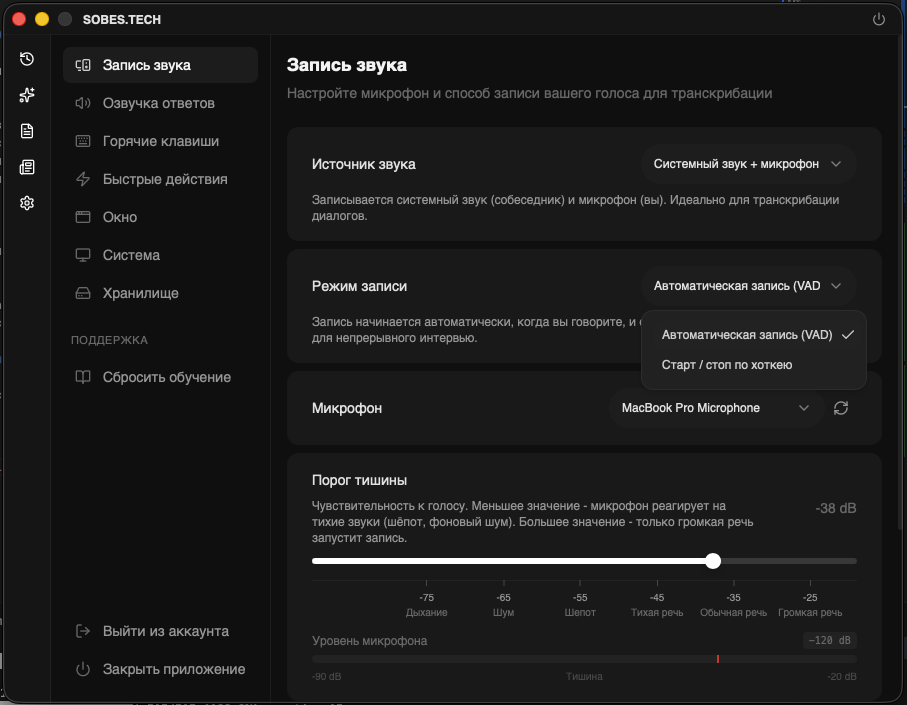
All Recording Settings
Capture settings are in the app settings under "Audio Recording". Some items appear only for a specific recording mode, audio source, platform, or app version.
Basic Settings
Audio Source is always visible. It chooses what to record: system audio + microphone, system audio only, or microphone only.
Recording Mode is always visible. It defines the recording button behavior: VAD, Toggle, or Oneshot.
Microphone appears when the selected source includes microphone audio. You can choose a specific input device here. If you keep "Default", the system default microphone is used.
Output Device appears on Windows when the selected source includes system audio. It chooses the speakers or headphones whose audio will be recorded.
Audio Source
System audio + microphone is for calls and interviews: it captures both your voice and the other person's audio.
System audio only captures app or speaker audio. Your microphone is not included.
Microphone only captures only your voice. Use it when you do not need system audio or when system audio gets in the way.
VAD Settings
Chunking is in advanced VAD settings and is on by default. It splits long speech into separate audio files so transcription and answer generation can start earlier.
Chunk Duration appears in advanced VAD settings when chunking is enabled. Range: 5 to 15 seconds, default 7 seconds. It limits the maximum length of one audio fragment before it is sent for transcription.
Recording Stop Trigger (microphone) appears in advanced VAD settings when the source includes microphone audio. Range: 0.5 to 5 seconds, default 0.5 seconds. It sets how much microphone silence is needed to finish the current speech fragment.
Recording Stop Trigger (system audio) appears in advanced VAD settings when the source includes system audio. Range: 0.5 to 5 seconds, default 1 second. It sets how much system-audio silence is needed to finish the current speech fragment.
Toggle Settings
Buffer Duration appears in Toggle. Range: 0 to 15 seconds, default 4 seconds. It adds a few seconds from before the press to the beginning of the recording, which helps when you press the hotkey slightly after the phrase begins.
Send screenshots with audio appears in Toggle and is on by default. It automatically attaches screenshots from chat to the audio fragment.
Check audio for speech is in advanced Toggle settings and is on by default. The recording is passed through Silero VAD, and fragments without speech are discarded. Disable it only if you need to send any audio, including silence and noise.
Oneshot Settings
Capture Duration appears in Oneshot. Range: 5 to 60 seconds, default 20 seconds. It sets how many latest seconds to take from the buffer when you press the hotkey.
Clear buffer after capture appears in Oneshot and is off by default. When enabled, it clears the buffer after each snapshot so the next press does not resend already transcribed audio.
Send screenshots with audio appears in Oneshot and is on by default. It automatically attaches screenshots from chat to the audio fragment.
Check audio for speech is in advanced Oneshot settings and is on by default. The recording is passed through Silero VAD, and fragments without speech are discarded. Disable it only if you need to send any audio, including silence and noise.
Frequently Asked Questions
Recording triggers from noise
The neural network filters non-speech sounds well, but high background noise levels may cause false triggers. Try reducing microphone sensitivity in system settings or use a headset.
Cuts off the beginning of phrases
In manual mode — increase the buffer length.
Recordings are discarded as empty
Neural network checks each recording for speech presence. If the model doesn't detect voice (for example, only background noise or music was recorded), the recording is automatically discarded. Make sure your microphone is properly configured and your speech is clear enough.